Saddle Safety & Care Guide
RIDE IT & LOVE IT.
With over a million Terry saddles on bicycles all over the world, rest assured you've made the right choice. Terry saddles have been revolutionizing the ride for nearly 2 decades, first for women, then for all.
Whether you're a weekend rider, long distance junkie or serious racer, you'll find there's a Terry saddle that suits your style of cycling and delivers the most comfortable ride imaginable. and just to make sure, we have an unmatched "ride it and love it" guarantee that allows you to return or exchange your saddle within 30 days if you're not completely satisfied.
WARRANTY/PRODUCT REGISTRATION.
Terry saddles are guaranteed for twenty-four months from the date of purchase. Register your saddle at www.terrybicycles.com/productregistration. A faulty product will be repaired or replaced by Terry within the warranty time frame if the defect is not due to carelessness, improper use or incorrect installation. This warranty is offered only to the original purchaser and can't be extended to third parties.
INSTALLING YOUR SADDLE.
PLEASE READ THIS GUIDE carefully before installing and using your saddle to assure proper safety, fit and durability. If there is any uncertainty about installation or compatibility of the seat post, consult your local bike shop.

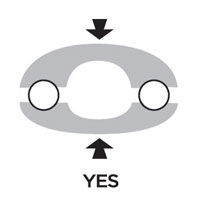
Figure 1
1. Seat post safety.The seat post used in conjunction with this saddle can affect the structural strength of the saddle. International test regulations require a saddle to be tested in combination with a recommended type of seat post. Certain types of rail clamping systems on some types of seat posts can compromise the strength of the saddle rail, or interfere with the saddle structure, altering the saddle's durability.
Please check the compatibility of your seat post rail clamp with the specifications given in (figure 1). Only use seat post rail clamps that have a clamping system of adequate size, and that cannot produce a cutting action on the saddle rail that could damage the rail and result in sudden failure during use.
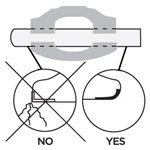
Figure 2
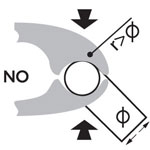
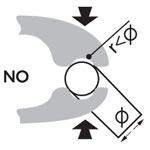

Figure 3
The seat post rail clamping system must not have sharp edges as this could reduce the saddle's useful life or cause breakage (figure 2). Before fitting the saddle, make sure the upper and lower cradle rail clamping system complies with that indicated in (figure 3), and only use seatpost clamps that allow the rail to settle completely within the clamping system. The force when tightening the seat post clamp should not exceed that recommended by the seat post manufacturer. Doing so creates pressure on the saddle rail that will damage the material and could result in sudden failure during use.

Figure 4
2. Installation.
Loosen the seat post clamp bolt with an allen wrench. Remove the bolt and the seat will come off (tip: paying attention to how everything fits together as you disassemble makes reassembling much easier). Take your new Terry saddle and set its rails into place. Make sure the rails are seated completely and are positioned between the permissible limits (STOP) marked on the rail (figure 4). Never move the saddle outside the stop limits, even if the shape of the rail allows for it. In most cases, saddle rail breakage is caused by fitting outside the permissible limits. Tighten the bolt to secure the seat.
Comply with the torque values indicated by the seat post manufacturers and, nonetheless, avoid exceeding 8 Nm for carbon rails and 15 Nm for metal rails. Over-tightening can create pressures on the saddle rail that will damage the material and potentially result in sudden failure during use.
If you are unsure how much to tighten the rail clamp, please consult your local bike shop.
3. Positioning.
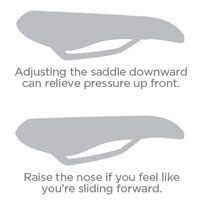
Start by positioning the saddle parallel to the ground, then test ride your bike. If you find it uncomfortable, try tilting the nose slightly downward (if you feel too much pressure up front) or upward (if you're sliding forward), then test ride again. Shifting the saddle back, or adjusting its height or angle, even by just a few millimeters, can considerably alter riding performance, comfort and pedaling action. Perfect positioning requires care and patience. Your local bike shop can be a big help in ensuring the right adjustment.
Make minor adjustments to find the right position for you.
CARING FOR YOUR SADDLE.
Your saddle should provide many miles of riding with the proper care. Avoid impacts to the top of the saddle. Keep it clean from dirt and sweat that builds up from use. Avoid using petroleum based oils or creams on the cover – use only mild soap and water to clean off any dirt, then air dry. Do not use stiff brushes, solvents or other chemical products since they can cause the glue to soften and separate the cover from the foam. After cleaning, dry the saddle away from direct heat and exposure to the sun. Failure to follow this advice may cause the leather to crack, split or harden. Inspect your saddle, seat post and fittings frequently to make sure everything's tight and properly aligned.
REPLACING YOUR SADDLE.
Just as tires wear out, so do bicycle seats. Any signs of cracking, warping, breaking or wear indicates that it is time for you to replace your saddle. Lighter colored saddles are more delicate (compared to black) and may wear out faster. Events like falls, impact mistreatment or excessive abuse will cause premature wear and damage. For safety reasons, Terry recommends replacing the saddle a maximum of 10 years or 9000 miles after purchase, or whenever signs or evidence of structural deterioration or wear are present.